Showing posts with label toddler activity. Show all posts

Sunday, April 14, 2013

Fairy and Elf Garden


Have you ever heard of a Fairy Garden?

I hadn't either until about a year and a half ago, probably on that damn addictive Pinterest.  What it is is an adorable little garden to "attract"  fairies.  You can use a planter, a big pot, or just create one in the ground, but what makes them super adorable is the itty-bitty furniture and fairy/elf paraphernalia.  You could go crazy making these things.  There are benches, houses, animals, tables, food.  Veerrrryyyy easy to go overboard.  I'm already planning the next one we make right now.

*Ahem*
I digress.

They are pretty popular in the States and not surprisingly in the UK, but I had never seen one or heard of them until I had my own wee one and was looking for a  fun, springtime, outdoor activity.
Not this past Christmas, but the Christmas before, I suggested to my step-dad that he get some stuff for Nicholas so that they could make a fairy garden together.  Somehow, we forgot to make it that spring.

Today I was taking the boys over to my parents' house to spend sometime with cousin Maya while daddy worked, and my mom had everything prepared for them to make their own little fairy/elf garden.

It was just gorgeous outside.  Bright sun, and spring (not summer) -like weather.

Even Monk came out to help with the garden. 
No, not really.  He sunbathes and preens.  Pretty doggie.

Our funny Oak oversaw the gardening as well.

Nick and Maya scooped up potting soil and poured it into the pot.
Nick loved the dirt.  I think he was more interested in that than anything else.
Scooping and dumping, scooping and dumping.


After they filled up the pot, they added two small plants.
We started very simple and small this year.

The kids took turns watering.  It was almost as popular as the dirt.

Nonni and Maya carefully arranged the table and chairs.

They added toadstools and little brick paths.

Nonni and Maya perfected everything, and Nick returned to the dirt.

There is Fairy Maya, and Elf Nick perched at their table.

There was even a little Elf Rhys!

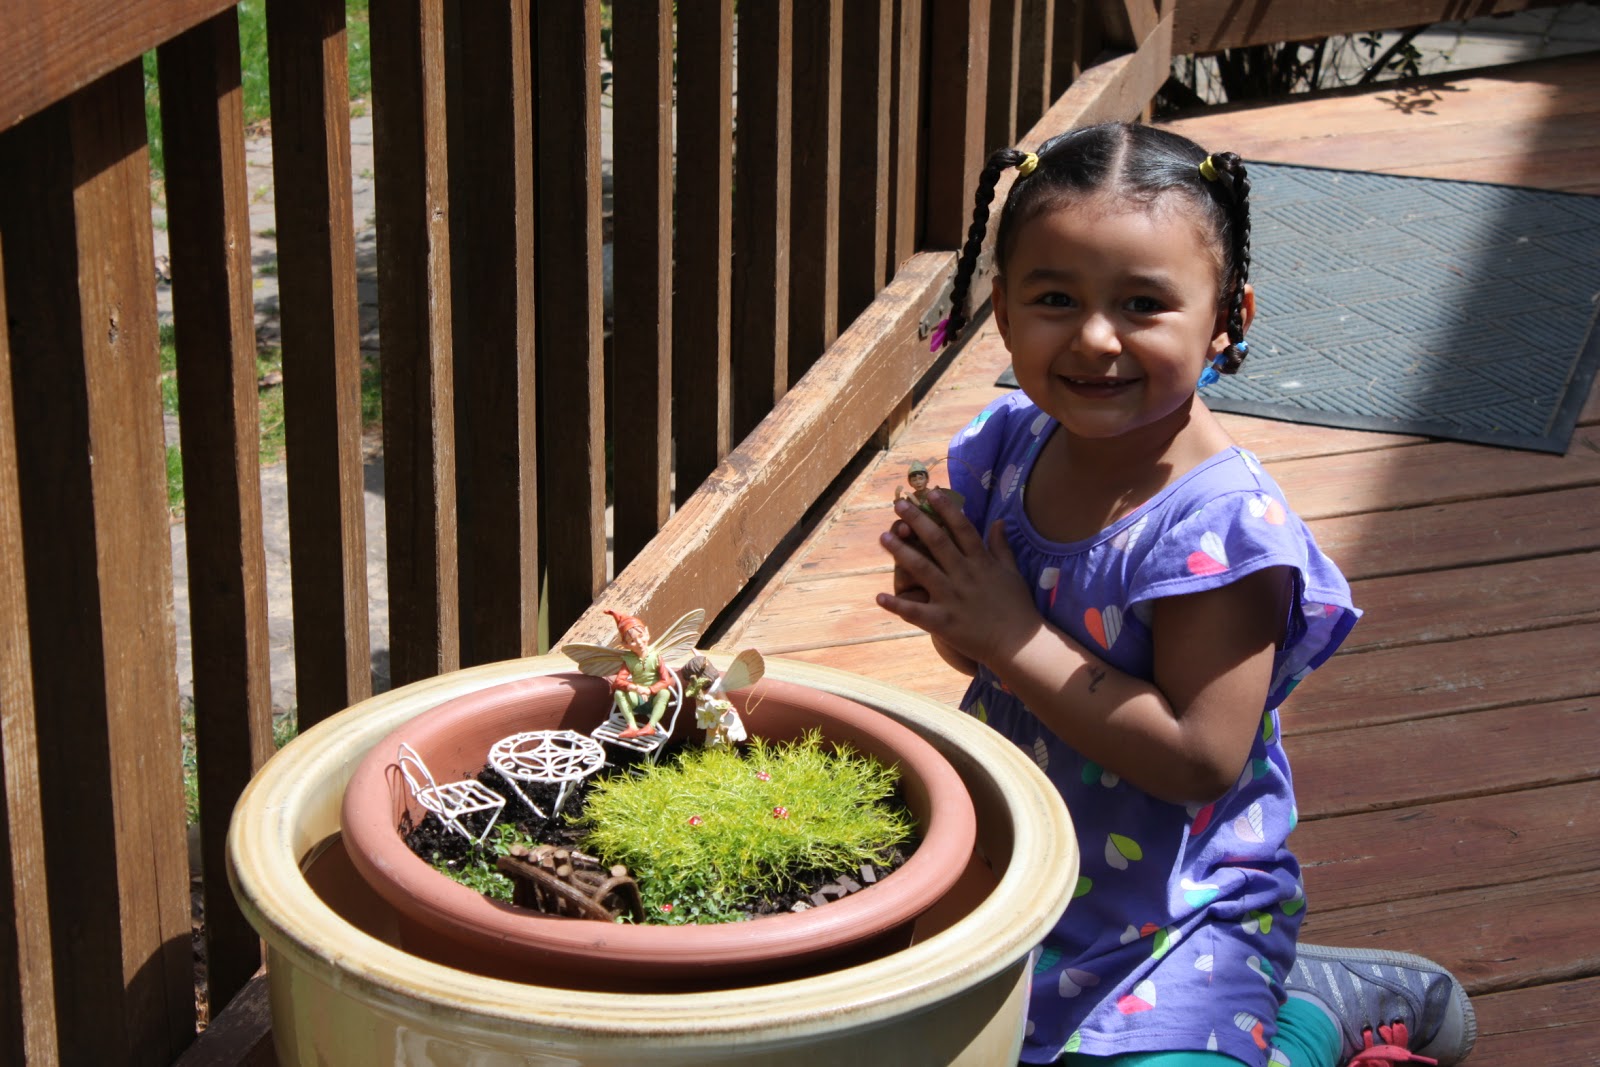
Maya enjoyed playing with them like little dolls.
So cute!
We returned to Nonni and Pop-Pop's for dinner that evening and Nick went outside to play.  He checked on the garden and the Elves and Fairy.  This activity was a hit for sure. 

If you have any interest, I would encourage you to Google "Fairy Garden" and check out all of the amazing photos.  You can make them as simple or as ornate as you desire, and it isn't too costly to make a basic one like ours.  We ordered all of our stuff here.  Happy gardening!

Wednesday, March 13, 2013

Leprechaun Milk


This activity was second in a series of St. Paddy's themed activities, see the first one here (or just scroll down) (they are adorable rainbow swirl cookies, and it has a small explanation of my new obsession with attempting to do themed activities.)   This met my new criteria of being easy, fast, fun, and thematic.  I gave Nick some Leprechaun Milk with appropriate mustache straw.  It was just his regular milk with a drop of food coloring, but it was funny to see his reaction, and what he decided to pair his milk with.


Mom, seriously?  You want me to drink green milk???
(His precious vanilla milk with a tiny drop of food coloring)

Very reluctant. 
Then it was followed by an emphatic  YUCK!
After I explain it's just vanilla milk with green food coloring,
 he seemed willing to consider giving it another try...

by dipping his turkey bacon into it.  MMM!

Seriously, he dunked it in and ate it. 

Delish! Lol!

Getting into the spirit.


And again, thanks to Pinterest, I discovered this cool activity here.  Many thanks to those other crafty moms who also share their fun activities :-)

Thursday, March 8, 2012

Sunday, March 4, 2012

Dough Experiment 6 Jello Playdough

 Jello Playdough

My expired Jello
 
Yikes, it's sticky.  Baby boy isn't going to like that.
Very unfortunate.  I have to clean this up?
 
I'm turning this into chopstick fun. 
That way N doesn't have to touch it with his hands.
The layout so he can pick up the dough with chopsticks
 
Into his front loader, THEN into the bowl
He even wanted to recover it from the ground with the chopsticks. Cute!
 
Choppers!
 
 
Playdough with Jello sounded interesting to me.  It would have a vibrant color, and would smell yummy.  I even had an expired box in the pantry, so I wouldn't be wasting, and it wouldn't even cost me a trip to the grocery store.  Ok, I thought, I'll give it a try.
 
After making it on the stovetop, I discovered it is sticky, quite a bit more sticky than most playdoughs. This is something to keep in mind while considering making it.  The vast majority of toddlers hate having sticky, dirty fingers, some more so than others.  Nick is somewhere in between, but I would say initially this was way stickier than even he would like (it did firm up a bit after setting on the counter for about 20 minutes after being cooked), so I decided to use some kids chopsticks that a friend had given me for Nick.  I hadn't used them before with Nick, because I thought they would be too difficult for him to use (he's 36 months at present), but I figured worse comes to worst I could just show him how to pick up the dough by piercing it.  I want to flat out admit I GREATLY underestimated my child's abilities.  I show him once how to put his fingers in and how to move them up and down and off he went.  He called them "snippers" like scissors, then I told him they were called chopsticks so he renamed them "choppers.". I placed different sized dough balls on a cookie sheet for him to pick up and transfer to a bowl.  Since this was the day after we had done the Mud Dough, he wanted to transfer the dough balls into a front loader with the chopsticks then dump them into the bowl.  He even used the chopsticks to pick up dough that had fallen on the ground.  He loved it.  A cool bonus was that he now loves using them at dinner occasionally too, when the food is the right size.
 
The verdict: I/Nick loved the chopstick aspect of the activity which I would definitely do again.  I think I thought the smell and color of the dough was cool, but honestly Nick probably would have enjoyed the chopstick part with any dough.  I'm not overly keen on using food- food, like Jello or cake mix in playdough. I mean what for? It's wasteful (unless it's expired like the jello and cake mix I used) and for younger kids it can be flat out confusing whether or not it's edible.  Then there was the stickiness factor, less appealing to the child, and parent who has to clean it.  And it turned my wooden spoon pink (i didn't really care that much, but use a metal one if you have one.  And the color won't run or stain anything once it is cooked.  This is true of all doughs and coloring methods, I have found.). 
Bottom line: If you are dying to try something different, go ahead, but there are better ones to do first in my opinion like:

 
Recipe (originally found here)
 
  • Flour 1 cup
  • Salt 2 tbsps
  • Cream of Tartar 2 tbsps
  • Cooking oil (canola, vegetable, for example) 2 tbsps
  • Water 1 cup
  • Packet of jello 1.3 oz (dry, not prepared)
 
Combine all of the ingredients in a large pot and cook over medium heat, stirring constantly until it pulls and thickens. Once it has become a big round blob.  Set it on wax paper to cool.  Once it cools, knead it until it has the proper consistency.

Tuesday, February 28, 2012

Dough Experiment 2 Galaxy Dough

 Galaxy Dough

This is another very cool dough that is much closer to regular play dough than Cloud Dough.  It is solid, not loose the way the Cloud Dough is.  It is different from regular play dough though in a couple of ways. Superficially, it is a deep rich black because of the added black food coloring (you could also add blue or purple to it, but I didn't think it was necessary). It also has glitter.  I added silver and iridescent glitter so it would be reminiscent of the stars.  Compositionally, it is different than standard play dough, because it contains not only flour and water, but also a ton of salt, and cream of tartar.  It makes it less dense, fluffier (although not fluffy, if that makes sense), less weighty, I suppose. Again, all of this reminiscent of space.


Nicholas loves learning about outer space and the planets, and astronauts are among his favorite professions to talk about, so I love that this could be applied to books, and outings, such as, the Air and Space Museum.


This did take longer in terms of preparation on my part, but not very long at all (15 minutes or so).  But there is no clean up on the other end, after playing with it, like the Cloud Dough.  It involves brief stovetop cooking, and the clean up of the pan afterward obviously.  If you get a little of the dough stuck on the bottom of the pan while cooking it, soak it in very hot water with dish soap and it wipes right off  (the same has been true of all of the doughs that I have made that need to be cooked on the stovetop).  I thought it was well worth it though.  I almost wish I hadn't prepared it ahead of time because I thought it was fun to knead the dough right when I took it out of the pan to get rid of some little unmixed bumps and more importantly, to add the ever essential glitter. The dough was nice and warm and I think that might have been another interesting sensory experience for Nick.

I broke out all of our books on outer space and read those to begin with.  I gathered a toy space shuttle and astronaut, and Buzz Lightyear to join in on the fun.  I also got out star and circle cookie cutters, and we made phases of the moon: crescent, half, and full moons, for example.  We made Saturn with rings. And even when we were done, Nick enjoyed eating planets and stars in the Milky Way (Kix and milk in a bowl)- ha, ha!

What you'll need:
  • 2 cups plain flour
  • 1 cup salt
  • 1 tbsp cream of tartar
  • 2 cups of water with desired food coloring added (I added 1 small bottle of black). The wet food coloring will stain your fingers at this step (while wet). Once it is cooked, it does not bleed from the dough at all.
  • 1 tbsp of cooking oil (vegetable or canola, for example)

Over medium heat, warm the water, food coloring, and oil.  In a bowl, stir together dry ingredients, then add to water on stovetop.  Stir with a spoon (wood or metal works fine, but metal is way easier to clean and won't absorb black coloring) until it gathers, take it off heat when it looks dull, and you can pinch it (carefully, it's hot) without it sticking too much.  Take pan off heat, take dough out and set it on the counter to cool. Once it has cooled slightly, knead out little bumps or just to get the consistency you'd like.

If you don't plan on using it right then, it will keep in an airtight container for a few weeks.  I wrap mine in plastic wrap, then put it in a zipper baggie.
Very cool
There's No Place Like Space. Prep with mommy.
Buzz, look at this moon rock.

Lil Space Person


Genius- breakfast afterwards was "planets" in the Milky Way.

Joy


Galaxy Dough recipe was found here at this amazing pre-school blog, Fairy Dust Teaching.  Check it out!

Dough Experiment 1 Cloud Dough

Cloud Dough
Today, we kicked off our dough experiment with Cloud Dough.  I found the recipe here.  I  have to say it is lovely to play with.  It consists of only flour and baby oil.  It is soft and silky with that trademark baby (talcum powder) smell.  The wonderful thing about Cloud Dough is that it holds its shape much like wet sand. It is great for packing into little cups, bowls, measuring tools, and sand toys.  Your little one can make prints in it with his hands, stamps, or cookie cutters.

Nicholas played with it for 30 minutes (a toddler eternity) and only stopped because I told him we were ending the activity. I learned from the non-cooking cooking that it is best to end before boredom/over-stimulation begins and then the inevitable mess ensues. 

He loved the Cloud Dough and I did too. Preparation was easy (only two ingredients required) and no cooking or even dyeing involved, and furthermore clean up is a breeze. It wipes off anything (floor, table, child) with the swipe of a wet towel. It will get dust on clothes though, so after we finished I took off his jammies before letting him loose into the living room.

Make some yourself. 

Recipe:  in a large container mix 4 cups flour and half cup baby oil (double the recipe if more than one child is playing). 

The end. It's that easy.

To store, I simply put the lid on the plastic container he was playing with it in (a plastic Tupperware/Rubbermade sort of to-go container).
Ingredients


Moldable clumps that really hold their shape

Feeling the silky texture
and measuring it out.
Such fun!

Friday, February 24, 2012

Non-Cooking Cooking

What an amazing time! Pretend cooking with real food is fantastic fun for little ones.  My son is 35 months now and has cooked quite a bit with me over the last year or so and enjoys it from time to time, but it is fair to say he enjoyed this way more.  No need for exact measurements. No waiting for mommy. Touching and spilling allowed- cool!

I set up the table with various containers, utensils, and cups.  Then I added water to little cups. The mini-pitcher contained just plain, clear water and the measuring cup had water with some blue food coloring mixed in. I chose lentils, oats, and flour for the ingredients, as I wanted the textures and colors to vary, and how water would effect them (would it dissolve, make paste/mush, etc.).

Nick poured, dumped, scooped, whisked, measured, and transferred all morning long, and kept asking me for more water and ingredients.  I would do it again in a heartbeat.  This is a gloriously messy good time. It is a guaranteed success: your child will love it.  To ensure that you love it too, here are a few hints based on what I have learned.   Pick a day (and time of day) when you don't mind your child, and most likely your kitchen, getting a little dirty.  The hardest thing to clean is the flour and water combo (makes a goop-y paste) and the flour makes dust too, so if that is hindering you, choose dry beans or peas (or something else), they will be far easier to clean.  Another thing that helped me too, is keeping an eye out for boredom and/or overstimulation. I have found out this is when the biggest messes are made and materials are flicked, flung, thrown, and momma gets frustrated/mad. It took about two messy activities for this to sink in, and now whenever I see a hint of boredom setting in, I announce "two more minutes" and then close shop.  He has fun, and I do too, without the titanic mess and me getting angry. So, I hope that helps you try the activity with your tot, and not regret trying it in the end. 


The set up


A little dab of this...


A dash of that...


Spooning ingredients into the mini-pitcher. Why not?  
Also, note the cool blue concoction on the right with the pastry brush.


Time lapse, probably 15 minutes later.


All done.
I'll just use my shirt here to wipe my hands.


Note: I found this cool idea at Play Create Explore an amazing mommy/preschool blog which is a great resource for toddler/ preschool activities, especially if you don't mind messes.